Wednesday, February 4, 2009

Realistic Fog & Mist

You would think that with something like the Clouds filter it would be easy to create a fog effect in a photograph, and indeed it is possible to "fog" an image very quickly just by applying the Clouds filter to a new layer and then changing the layer’s Blending Mode to Screen. However, this rarely, if ever, looks truly authentic. To create a fog effect that looks convincing, we need to bear in mind two things:

Point 1 - In a photograph of real fog, the fog has the effect of lightening and desaturating the colours in the image and this effect increases with distance.

Point 2 - Objects in the foreground that extend into the middle distance area, or into the background plane of the image, remain unfogged. Notice how the nearest lamp-post in this photo of real fog isn't affected by the fog in the background:

So here's what to do:

Step 1: Open a suitable image in Photoshop. Here's mine:


Step 2: Add a Hue/Saturation adjustment layer (Click the Create new fill or adjustment layer icon at the bottom of the Layers palette and then select Hue/Saturation..., or select Layer > New Adjustment Layer > Hue/Saturation... from the menu). Change the settings to the following:

Click OK to apply the Hue/Saturation layer. Your original image will have totally disappeared, but don't panic!

Step 3: Press D on the keyboard to set default colours (black foreground and white background), then press G to select the Gradient tool. Make sure that you have the Foreground to Background gradient selected, and that Linear Gradient is also selected. Click on the Layer Mask thumbnail in the Layers palette, then click and drag from the bottom of the image to the top. Your image should now look something like this:

Step 4: With the Hue/Saturation layer's Layer Mask still selected, use a fairly large, soft-edged brush to paint black onto any foreground areas that extend into the "fogged" area. This clears the fog away, further helping to give the fog layer the illusion of depth. In the above image, I cleared the fog from the bush in the foreground.

If you think the effect is too extreme you can always lower the Opacity of the Hue/Saturation layer, or double-click its thumbnail in the Layers palette to bring up the Hue/Saturation dialog and change the settings to reduce the effect.

You could leave it at that (and I've seen photos of real fog that look just like this), but to give the image that extra bit of pizazz you can add some texture to the fog as follows:

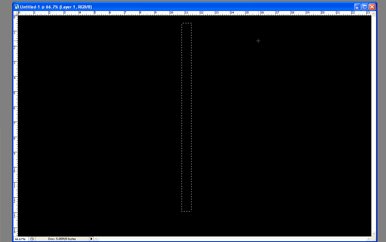
Step 5: Add a new layer between the Background layer and the Hue/Saturation layer. Let's call this layer Mist. Select the Rectangular Marquee tool and set Feather to something around 30 pixels:

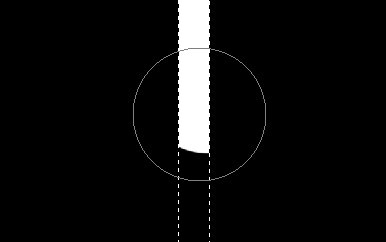
Select an area that covers the middle distance in the image, like this:

Step 6: Select Filter > Render > Clouds to fill the selection with clouds. Press Ctrl+D to deselect.

Step 7: Right-click the Mist layer in the Layers palette and select Blending Options. In the 'Blend If:' section of the Blending Options dialog box, Alt+click the little black stop at the left end of the 'This Layer:' gradient:

This splits the black stop into two. Click the right black stop and drag it way over to the right end of the gradient, so it looks something like this:

Click OK. Your fog should now have some texture in the middle distance:

Again, you could leave it like that, but for that final touch...

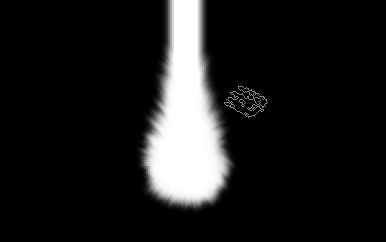
Step 8: With the Mist layer still active, Select Edit > Transform > Perspective. Drag the corner handles until you have a trapezoid shape like this:

Press Return or click on the Commit Transform button.

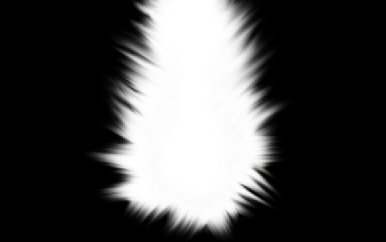
Step 9: Select Edit > Transform > Scale. Change the Width setting in the toolbar (W:) to 1000%, then press Return or click on the Commit Transform button:

You might find you need to tweak the Mist layer's blending options a little to enhance the detail of the mist trails, or adjust the Opacity of either the Hue/Saturation layer or the Mist layer (or both). You might also need to use the Eraser tool on the Mist layer to clear any unwanted mist from the foreground. Anyhow, here's what I ended up with:

Create Light Beam

Step: 0
Open a new document. Make it big enough. I used 2000x1500. Fill the background with black.

Step: 1
We are now going to make the main body of our beam. Make a new layer and Select a rectangle about 20px wide and 1000px tall.


Step: 2
Fill the rectangle with white on the new layer. Duplicate the layer and use Gaussian blur on it to give the original rectangle a little bit of a glow. Merge the layers.


Step: 3
Using the smudge tool with a
"chalk" brush and a 14% strength make a water droplet shape out of the bottom of our rectangle.


Step: 4
Duplicate the layer. Increase the strength of the smudge tool to about 30% and make the droplet bigger.


Set the opacity of the new layer down to about 50%.


Step: 5
Use the
Light Rays tutorial to make a whole bunch of light rays around our beam. Each on its own layer of course.


Step: 6
If some of the light rays dont fit in well you can use the liquify tool to bend them a little. You should now have something like this.


Step: 7
Merge all the Light Rays onto one layer. Duplicate that layer a few times and add various blur effects. I used motion blur at 52 degrees and then on another copy of the light rays layer motion blur at -52 degrees. Then I added a layer of Gaussian blur to make the rays look like they are glowing.


Step: 8
We are now going to add some dust particles. Using the
Dust Particles tutorial make dust around the rays.

Step: 9
Duplicate the dust layer a few times and add various blur settings. I used radial blur to give the beam the effect that it was moving really fast. And some Gaussian blur to give the dust a glow.


Step: 10
I didnt like the original beam body. I used a layer mask and a fuzzy brush to get rid of the stem and added a thinner one.


Step: 11
Merge everything.

Step: 12
Using the Color Balance tool add color to the beam.


That concludes this tutorial.

Using slightly different settings I made these beams as well:

Create a Powerful Mental Wave Explosion Effect

Step 1

Open a new document. I used 800x600px. Look for a road photo on the Internet. The one I used can be downloaded here. After downloading, place the photo in your document.

Step 1

Step 2

Now we need a photo of a person. The one I used can be found here. Once you have your photo, it's time to extract the guy from the background. Using the Pen Tool(P) create a path like in the image below. After that go to the Paths Palette and create a selection from that path. Then go to Layer>Layer Mask>Reveal Selection. Lastly, I named this layer "dude."

Step 2

Step 3

Go to Edit>Transform>Scale and reduce the size of the guy. Then go to Edit>Transform>Flip Horizontal. We do that to match the light direction.

Step 3

Step 4

Go to Image>Adjustments>Curves. The idea here is to darken the guy a little bit so he will fit better with the background. Use the image below as a reference.

Step 4

Step 5

Holding Cmd/Ctrl click on the mask thumb of the "dude" layer. That will create a marquee selection of the guy. After that create a new layer. Rename it to "shadow" and fill it with black. Then go to Edit>Transform>Distort and move the vertices to make the shadow in perspective. The last thing here is go to Filter>Blur>Gaussian Blur.

Step 5

Step 6

Grab the Ellipse Tool(U). Select Paths instead of Shape Layer. Create a Circle, like the image below. After that grab the Direct Selection Tool(A) and adjust the bottom of the circle.

Step 6

Step 7

Create a new layer. Rename it to "clouds." Then go to Filter>Render>Clouds. While holding Alt, click on Clouds. After that go to the Path's Palette and create a selection from the path and mask the layer.

Tip: As you will be using the Render>Clouds, you will probably need to apply the filter several times until you got the clouds just right. Keep working with it until the light and dark areas are in a good position.

Step 7

Step 8

Go to Filter>Liquefy. In the Liquefy Dialog Box select the Bloat Tool (B). Then for the settings use: Brush Size 550, Brush Density 100, Brush Pressure 100, Brush Rate 60, and Turbulent Jitter 75.

Then select the Show Backdrop Option. That will allow you to see the clouds and the background. It will be necessary to use the Bloat Tool in the right place. Click a few times and deselect the Show Backdrop. Then you will see the effect and will be able to repeat it more times in the correct place.

Step 8

Step 9

Change the Blend Mode of the cloud layer to Soft Light. Then create another layer and rename it to "Clouds 2" and repeat Steps 7 and 8. We will need another cloud to make it more turbulent. This time, however, use Multiply for the Blend Mode.

After that, create yet another layer. Rename it to "Clouds 3" and repeat Steps 7 and 8. For this layer use Color Dodge for the Blend Mode. The last thing here is with the Eraser Tool (E) delete some parts. This layer is used to give highlights to the clouds.

Step 9

Step 10

Group the "Clouds 3" layer and go to Layer>Layer Mask>Reveal All. After that, select the Brush Tool (B), give it a black color, and mask some parts of the clouds that are close to the ground.

Step 10

Step 11

Select the "Clouds" layer and go to Filter>Sharpen>Sharpen More. Then repeat this Sharpen filter on Clouds 2 and 3 layers.

Step 11

Step 12

Create a new layer. Rename it to "Glow." Fill it with white and go to the Path Palette. Create a selection from the clouds path as we did in Step 9. Then mask the layer.

After that go to Layer>Layer Style>Outer Glow. Use the default settings. Then go to Layer>Layer Style>Create Layer. This command will create another layer from the Outer Glow. You can delete the white layer and leave just the Outer Glow layer.

Step 12

Step 13

Create a folder called "Lights." Move the "Glow" layer to this folder. Next select the "Glow" layer. Then go to Layer>Layer Mask>Reveal All. Then select the Brush Tool, black for the color, and start masking the glow. We need just the outline; however, some bright spots in the middle will give a nice result.

Step 13

Step 14

Create a new layer beneath the clouds group. Using the Elliptical Marquee Tool create a selection like the image below. Fill the layer with black and use 40% Opacity.

Step 14

Step 15

Go to Layer>Layer Mask>Reveal All. After that select the Gradient Tool(G) and use a black and white gradient. Then mask the layer, like in the image below.

Step 15

Step 16

Duplicate the layer and go to Layer>Layer Mask>Apply. Then go to Edit>Transform>Distort. Repeat the same thing we did for the shadow of the guy on this layer. Group these two layers and rename the group to "Shadows."

Step 16

Step 17

Create a new layer right above the road photo. Go to Filter>Render>Clouds. Then go to Filter>Distort>ZigZag. Use 100 for the Amount and 5 for the Ridges. For the Style use Pond Ripples.

Step 17

Step 18

Now go to Edit>Transform>Distort. Distort the layer until you get the right perspective. After that, change the Blend Mode to Overlay. Again, as we are using Render Clouds, the results may vary so you might need to erase some parts to make it more realistic.

Step 18

Step 19

Create an Elliptical Selection like the image below. Then fill it with black. After that, create another Elliptical Selection, but smaller. Then delete that part of the layer. With the Magic Wand Tool(W) select the black part of the layer.

Step 19

Step 20

Duplicate the road's layer and select it. Make sure that you still have the Marquee Selection from the Step 19. Then go to Layer>Layer Mask>Reveal Selection. You can delete the black ellipse layer from the Step 19 or just hide it.

Go to Layer>Layer Styles>Bevel and Emboss. This is another way to create the ripple effect. You could use Displace as well.

Step 20

Step 21

Go to Layer>New Layer Fill>Gradient. Use Radial for the Style. For the colors use #ddc396 and #2f1e00. Change the Blend mode to Color Dodge.

Step 21

Step 22

Here I used another image from Stock.Xchng, image. Just place it on top of all layers and change the Blend Mode to Overlay.

Step 22

Step 23

Now let's make some adjustments. First, lets darken our Magneto dude a bit more. Select the Burn Tool(S) and burn the back of the guy. After that, change the Blend Mode of the "ripples" layer to Soft Light. You can delete some parts of the clouds as well.

Step 23

Step 24

Create a new folder, beneath the "dude" layer. Name the group "power" and change the Blend Mode to Color Dodge. After that, create a new layer inside of this group. Then using the Brush Tool with white color, create some lights coming from the hands of the guy. Tip: use a regular brush with 0% for the hardness.

After that you create another layer. Use some brushes to add more effects. I used some abstract brushes from http://brusheezy.com. Then add a Pink Outer Glow Layer Style.

Step 24

Step 25

Import the truck image, you can download it at image. Then with the Magic Wand Tool(W) select and delete the background of the photo. Leave just the truck. After that go to Edit>Transform>Flip Horizontal. Move the truck to the side of the road.

Step 25

Step 26

Go to Image>Adjustments>Curves and make the truck a bit darker. After that, using the Rectangular Marquee Tool(M), create a rectangular selection a bit bigger than the truck. Then go to Filter>Blur>Radial Blur. For the settings use Amount 2, Method use Spin, and set Best Quality. Next go to Filter>Blur>Motion Blur. Then use -75 degrees for the angle and 3 pixels for the Distance.

Step 26

Step 27

Now we will create the truck's shadow. To do that select the Truck's layer, click with the right button of the mouse and choose Select Pixels. Then create a new layer and fill it with black. Put this layer beneath the truck layer and go to Edit>Transform>Distort. Distort the shadow to make it look more real. Then go to Filter>Blur>Gaussian Blur. Change the Opacity of this layer to 60%.

Step 27

Step 28

Group the truck and the shadow layer and rename it to "truck." Then organize your folders in the Layers Palette.

Step 28

Conclusion

You can add more elements to the image, like a traffic cone or more cars. But always change the curves in order to make the objects have the same lighting. That will make the image more realistic. For some effects, there will be many other ways to achieve a similar result. Experiment with different methods of achieving an effect, like we did with the ripples. Finally, stick with the ones you think are the best for that image.

Conclusion